WebPack可以看做是模块打包机:把你的项目当做一个整体,通过一个给定的主文件(如:index.js),从这个文件开始分析你的项目结构,找到项目的所有依赖文件,使用loaders处理它们,最后打包为一个浏览器可识别的JavaScript文件。本文仅限于个人学习所用,原文转载自 慢清尘 ,根据个人学习与整理略有删减。
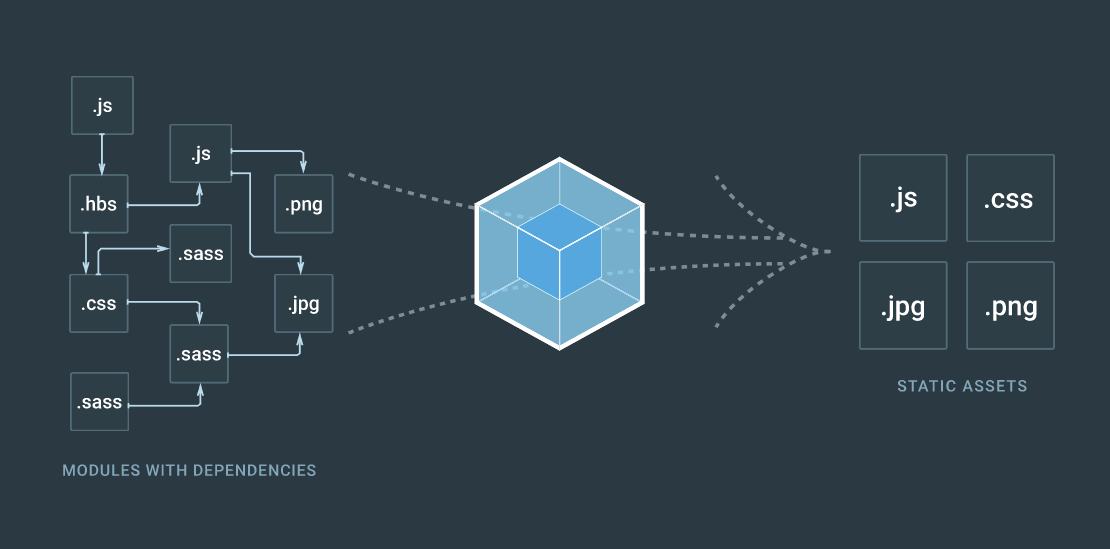
1、配置webpack
1.1 新建一个项目文件夹,并且安装webpack
1 2 3
| mkdir webpack-demo && cd webpack-demo npm init -y npm install --save-dev webpack
|
1.2 新建html以及js文件如下
1 2 3 4 5 6 7 8 9 10
| <html> <head> <title>webpack</title> </head> <body> <div class="g-index"></div> <script src="dist/bundle.js"></script> </body> </html>
|
1 2 3 4 5 6 7 8
| <!-- common.js --> exports.printmsg = function(msg) { console.log(msg); } <!-- index.js --> var lib = require('./common.js') lib.printmsg('good')
|
1.3 编译webpack
1
| webpack src/js/index.js dist/bundle.js
|
打包结果如下:
1 2 3 4 5 6 7 8
| $ webpack src/js/index.js dist/bundle.js Hash: 39e1d99d27c58dd34eb1 Version: webpack 2.5.1 Time: 81ms Asset Size Chunks Chunk Names bundle.js 2.82 kB 0 [emitted] main [0] ./src/js/common.js 58 bytes {0} [built] [1] ./src/js/index.js 50 bytes {0} [built]
|
项目结构列表:
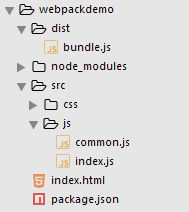
2、编写配置文件
Webpack拥有很多高级的功能,这些功能其实都可以通过命令行模式实现,但是正如已经提到的,这样不太方便且容易出错的,一个更好的办法是定义一个配置文件,这个配置文件其实也是一个简单的JavaScript模块,可以把所有的与构建相关的信息放在里面。
2.1 在根目录下面新建 webpack.config.js
1 2 3 4 5 6 7 8 9
| var path = require('path'); module.exports = { entry: './src/js/index.js', output: { filename: 'bundle.js', path: path.resolve(__dirname, 'dist') } };
|
2.2 修改 package.json,添加条目如下:
1 2 3 4 5 6 7
| { ... "scripts": { "build": "webpack", }, ... }
|
2.3 使用命令行编译项目
3、调试webpack
开发总是离不开调试,如果可以更加方便的调试当然就能提高开发效率,不过打包后的文件有时候你是不容易找到出错了的地方对应的源代码的位置的,Source Maps就是来帮我们解决这个问题的。通过简单的配置后,Webpack在打包时可以为我们生成的source maps,这为我们提供了一种对应编译文件和源文件的方法,使得编译后的代码可读性更高,也更容易调试。
| devtool选项 |
配置结果 |
| source-map |
在一个单独的文件中产生一个完整且功能完全的文件。这个文件具有最好的source map,但是它会减慢打包文件的构建速度; |
| cheap-module-source-map |
在一个单独的文件中生成一个不带列映射的map,不带列映射提高项目构建速度,但是也使得浏览器开发者工具只能对应到具体的行,不能对应到具体的列(符号),会对调试造成不便; |
| eval-source-map |
使用eval打包源文件模块,在同一个文件中生成干净的完整的source map。这个选项可以在不影响构建速度的前提下生成完整的sourcemap,但是对打包后输出的JS文件的执行具有性能和安全的隐患。不过在开发阶段这是一个非常好的选项,但是在生产阶段一定不要用这个选项; |
| cheap-module-eval-source-map |
这是在打包文件时最快的生成source map的方法,生成的Source Map 会和打包后的JavaScript文件同行显示,没有列映射,和eval-source-map选项具有相似的缺点; |
在学习阶段以及在小到中性的项目上,eval-source-map 是一个很好的选项,不过记得只在开发阶段使用它,继续上面的例子,进行如下配置:
1 2 3 4 5 6 7 8 9
| var path = require('path'); module.exports = { entry: './src/js/index.js', output: { filename: 'bundle.js', path: path.resolve(__dirname, 'dist') }, devtool: 'eval-source-map' };
|
4、建立本地开发服务器
Webpack提供一个可选的本地开发服务器,这个本地服务器基于node.js构建,可以实现代码的热加载功能,可以通过它方便的进行代码的开发。其构建方法如下:
4.1 安装 webpack-dev-server
1
| npm install --save-dev webpack-dev-server
|
4.2 修改配置文件 webpack.config.js
1 2 3 4 5 6 7 8 9 10 11 12 13
| var path = require('path'); module.exports = { entry: './src/js/index.js', output: { filename: 'bundle.js', path: path.resolve(__dirname, 'dist') }, devServer: { contentBase: "./", port: 9000, inline: true } };
|
4.3 修改 package.json ,添加条目如下:
1 2 3 4 5 6 7
| { ... "scripts": { "dev": "webpack-dev-server", }, ... }
|
4.4 输入 npm run dev 启动 webpack-dev-server
1 2 3 4 5 6 7 8 9 10 11 12 13 14 15 16 17 18 19 20 21 22 23 24 25 26 27 28 29 30 31 32 33
| $ npm run dev > webpackproj@1.0.0 dev F:\Project\DEMO\webpackdemo > webpack-dev-server Project is running at http://localhost:9000/ webpack output is served from / Content not from webpack is served from ./ Hash: 1aca755d21fcb2c76314 Version: webpack 2.5.1 Time: 918ms Asset Size Chunks Chunk Names bundle.js 316 kB 0 [emitted] [big] main bundle.js.map 375 kB 0 [emitted] main chunk {0} bundle.js, bundle.js.map (main) 302 kB [entry] [rendered] [35] (webpack)-dev-server/client?http://localhost:9000 5.68 kB {0} [built] [36] ./src/js/index.js 69 bytes {0} [built] [37] ./~/ansi-html/index.js 4.26 kB {0} [built] [38] ./~/ansi-regex/index.js 135 bytes {0} [built] [40] ./~/events/events.js 8.33 kB {0} [built] [41] ./~/html-entities/index.js 231 bytes {0} [built] [48] ./~/querystring-es3/index.js 127 bytes {0} [built] [76] ./~/strip-ansi/index.js 161 bytes {0} [built] [78] ./~/url/url.js 23.3 kB {0} [built] [79] ./~/url/util.js 314 bytes {0} [built] [80] (webpack)-dev-server/client/overlay.js 3.73 kB {0} [built] [81] (webpack)-dev-server/client/socket.js 897 bytes {0} [built] [83] (webpack)/hot/emitter.js 77 bytes {0} [built] [84] ./src/js/common.js 58 bytes {0} [built] [85] multi (webpack)-dev-server/client?http://localhost:9000 ./src/js/index.js 40 byte s {0} [built] + 71 hidden modules webpack: Compiled successfully.
|
5、配置HTML代码热加载
webpack-dev-server 只能监控入口文件(JS/LESS/CSS/IMG)的变化,因此 HTML文件的变化必须依赖插件来进行监控。
5.1 安装 html-webpack-plugin
1
| npm install html-webpack-plugin --save-dev
|
5.2 修改配置文件 webpack.config.js , 把 index.html 加入监控
1 2 3 4 5 6 7 8 9 10 11 12 13 14 15 16 17 18 19 20
| var path = require('path'); var HtmlWebpackPlugin = require('html-webpack-plugin') module.exports = { entry: './src/js/index.js', output: { filename: 'bundle.js', path: path.resolve(__dirname, 'dist') }, plugins: [ new HtmlWebpackPlugin({ template: './index.html' }), ], devServer: { contentBase: "./", port: 9000, inline: true } };
|
此时可以取消 html 文件内的 js 引用,因为 html-webpack-plugin 会自动加载编译完的 js 文件。
6、配置自动打开浏览器
通过配置 open-browser-webpack-plugin 可以在webpack编译完之后自动打开浏览器;
6.1 安装 open-browser-webpack-plugin
1
| npm install open-browser-webpack-plugin
|
6.2 修改配置文件 webpack.config.js
1 2 3 4 5 6 7 8 9 10 11 12 13 14 15 16 17 18 19 20 21 22 23 24
| var path = require('path'); var HtmlWebpackPlugin = require('html-webpack-plugin') var OpenBrowserPlugin = require('open-browser-webpack-plugin'); module.exports = { entry: './src/js/index.js', output: { filename: 'bundle.js', path: path.resolve(__dirname, 'dist') }, plugins: [ new HtmlWebpackPlugin({ template: './index.html' }), new OpenBrowserPlugin({ url: 'http://localhost:9000' }) ], devServer: { contentBase: "./", port: 9000, inline: true } };
|
7、配置 json 加载器
使用 json 解析器可以将常量数据定义在 json文件中,然后在 js 文件中调用。
7.1 在项目根目录下面创建 config.json 文件,内容如下:
1 2 3 4
| { "name": "demo", "type": "HTML5" }
|
7.2 修改 index.js
1 2 3
| var config = require('../../config.json') var lib = require('./common.js') lib.printmsg(config.name)
|
7.3 修改配置文件 webpack.config.js
1 2 3 4 5 6 7 8 9 10 11 12 13 14 15
| var path = require('path'); module.exports = { entry: './src/js/index.js', output: { filename: 'bundle.js', path: path.resolve(__dirname, 'dist') }, module: { rules: [{ test: /\.json$/, loader: "json-loader" }] } };
|
项目结构如下:
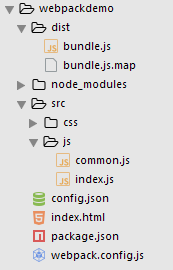
8、配置 LESS 编译
8.1 安装 less style-loader css-loader less-loader
1
| npm install less style-loader css-loader less-loader
|
8.2 在项目的css目录下面创建 index.less 文件,内容如下:
1 2 3 4 5 6 7 8
| @charset "utf-8"; @gray-base: #000; @gray-light: lighten(@gray-base, 46.7%); .g-index { height: 100vh; background: @gray-light; }
|
8.3 修改 index.js
1 2 3 4
| require('../css/index.less') var lib = require('./common.js') lib.printmsg('good')
|
8.4 修改配置文件 webpack.config.js
1 2 3 4 5 6 7 8 9 10 11 12 13 14 15 16 17
| var path = require('path'); module.exports = { devtool: 'source-map', entry: './src/js/index.js', output: { filename: 'bundle.js', path: path.resolve(__dirname, 'dist') }, module: { rules: [ { test: /\.less$/, loader: 'style-loader!css-loader!less-loader' },] } };
|
项目结构如下:
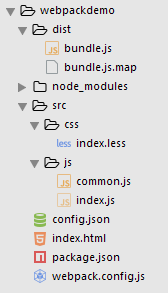
9、配置 Babel 编译
9.1 安装 babel-core babel-loader babel-preset-es2015
1
| npm install babel-core babel-loader babel-preset-es2015 --save-dev
|
9.2 修改 common.js 为 ES6 格式
1 2 3
| exports.printmsg = (msg) => { console.log(msg); }
|
9.3 修改配置文件 webpack.config.js
1 2 3 4 5 6 7 8 9 10 11 12 13 14 15 16 17 18 19
| var path = require('path'); module.exports = { devtool: 'source-map', entry: './src/js/index.js', output: { filename: 'bundle.js', path: path.resolve(__dirname, 'dist') }, module: { rules: [{ test: /\.js$/, exclude: /node_modules/, loader: 'babel-loader', query: { presets: ['es2015'] } }] } };
|
10、配置 jQuery 解析器
10.1 安装 jquery
1
| npm install jquery --save-dev
|
10.2 修改 index.js 调用 jquery 函数
1 2 3 4 5 6 7
| require('jquery') $(init) function init() { var lib = require('./common.js') lib.printmsg('good') }
|
10.3 修改配置文件 webpack.config.js
1 2 3 4 5 6 7 8 9 10 11 12 13 14 15 16 17 18 19 20 21 22 23 24 25 26 27 28
| var path = require('path'); var webpack = require('webpack'); module.exports = { devtool: 'source-map', entry: './src/js/index.js', output: { filename: 'bundle.js', path: path.resolve(__dirname, 'dist') }, module: { rules: [{ test: /\.js$/, exclude: /node_modules/, loader: 'babel-loader', query: { presets: ['es2015'] } }] }, plugins: [ new webpack.ProvidePlugin({ $: "jquery", jQuery: "jquery", "window.jQuery": "jquery" }) ] };
|
11、配置 javascript 代码压缩
11.1 修改配置文件 webpack.config.js, 在 plugin 中添加 webpack.optimize.UglifyJsPlugin 模块
1 2 3 4 5 6 7 8 9 10 11 12 13 14 15 16 17 18 19 20 21 22 23 24 25 26 27 28 29
| var path = require('path'); var webpack = require('webpack'); var uglifyJsPlugin = webpack.optimize.UglifyJsPlugin; module.exports = { devtool: 'source-map', entry: './src/js/index.js', output: { filename: 'bundle.js', path: path.resolve(__dirname, 'dist') }, module: { rules: [{ test: /\.js$/, exclude: /node_modules/, loader: 'babel-loader', query: { presets: ['es2015'] } }] }, plugins: [ new uglifyJsPlugin({ compress: { warnings: false } }) ] };
|
12、配置 eslint 语法解析
12.1 安装 esline 库
1
| npm install eslint eslint-loader eslint-friendly-formatter eslint-plugin-html babel-eslint eslint-config-standard eslint-plugin-import eslint-plugin-node eslint-plugin-promise eslint-plugin-standard --save-dev
|
12.2 在项目根目录下添加 eslint 配置文件 .eslintrc.js
1 2 3 4 5 6 7 8 9 10 11 12 13 14 15 16 17 18 19 20 21 22 23 24 25 26 27 28
| module.exports = { root: true, parser: 'babel-eslint', parserOptions: { sourceType: 'module' }, env: { browser: true, }, extends: 'standard', plugins: [ 'html' ], 'rules': { 'arrow-parens': 0, "indent": [2, 4], 'no-undef': 0, 'generator-star-spacing': 0, 'no-debugger': process.env.NODE_ENV === 'production' ? 2 : 0 } }
|
13、配置图片压缩器
13.1 安装 url-loader 库
1
| npm install url-loader --save-dev
|
13.2 修改 index.less 文件
1 2 3 4 5 6 7 8 9
| @charset "utf-8"; @gray-base: #000; @gray-light: lighten(@gray-base, 46.7%); .g-index { height: 100vh; background: @gray-light; background: url('../img/small.png') no-repeat; }
|
### 13.3 修改配置文件 webpack.config.js
1 2 3 4 5 6 7 8 9 10 11 12 13 14 15 16 17 18 19
| var path = require('path'); var webpack = require('webpack'); module.exports = { devtool: 'source-map', entry: './src/js/index.js', output: { filename: 'bundle.js', path: path.resolve(__dirname, 'dist') }, module: { rules: [ { test: /\.less$/, loader: 'style-loader!css-loader!less-loader' }, { test: /\.(png|jpg)$/, loader: 'url-loader?limit=8192' }] }
|
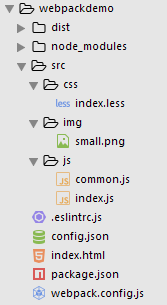
项目结构如下:
14、配置公共库抽取
14.1 安装 chunk-manifest-webpack-plugin webpack-chunk-hash 库
1
| npm install chunk-manifest-webpack-plugin webpack-chunk-hash
|
14.2 修改配置文件 webpack.config.js
1 2 3 4 5 6 7 8 9 10 11 12 13 14 15 16 17 18 19 20 21 22 23 24 25 26 27 28 29 30 31 32 33 34 35 36 37 38 39 40 41 42 43 44 45 46
| var path = require('path'); var webpack = require('webpack'); var HtmlWebpackPlugin = require('html-webpack-plugin') var WebpackChunkHash = require("webpack-chunk-hash"); var ChunkManifestPlugin = require("chunk-manifest-webpack-plugin"); module.exports = { devtool: 'source-map', entry: { main: './src/js/index.js', vendor: ['jquery'] }, output: { filename: '[name].[chunkhash].js', path: path.resolve(__dirname, 'dist') }, module: { rules: [ { test: /\.less$/, loader: 'style-loader!css-loader!less-loader' }, { test: /\.(png|jpg)$/, loader: 'url-loader?limit=8192' }] }, plugins: [ new HtmlWebpackPlugin({ template: './index.html' }), new webpack.ProvidePlugin({ $: "jquery", jQuery: "jquery", "window.jQuery": "jquery" }), new webpack.optimize.CommonsChunkPlugin({ name: ["vendor", "manifest"], minChunks: Infinity, }), new webpack.HashedModuleIdsPlugin(), new WebpackChunkHash(), new ChunkManifestPlugin({ filename: "chunk-manifest.json", manifestVariable: "webpackManifest" }) ] };
|
15、配置模块分析器
在项目复杂的情况下,为了分析多个模块的相互依赖以及打包的关系,通常引入模块打包分析工具,可以清晰的给出每个模块的依赖关系。
15.1 安装 webpack-bundle-analyzer 库
1
| npm install webpack-bundle-analyzer
|
15.2 修改配置文件 webpack.config.js
1 2 3 4 5 6 7 8 9 10 11 12 13 14 15 16 17
| var path = require('path'); var { BundleAnalyzerPlugin } = require('webpack-bundle-analyzer') module.exports = { devtool: 'source-map', entry: { main: './src/js/index.js', vendor: ['jquery'] }, output: { filename: '[name].[chunkhash].js', path: path.resolve(__dirname, 'dist') }, plugins: [ new BundleAnalyzerPlugin() ] };
|
原文转载自 慢清尘 ,根据个人学习与整理略有删减。
分享到:


